Naomi
The Perfect Free Wrap Top Pattern
This cute top is perfect for beginners, with the hemming and sleeve sewing being the most challenging parts of the project. No buttons or zippers are needed! I really enjoyed making this top—I’ve even made one for a friend, and I’ve worn mine countless times. I hope you will too!
For this project, you will need:
- One and a half meters of lightweight, flowy fabric
- Yarn
- An iron and ironing board
- And of course, the pattern
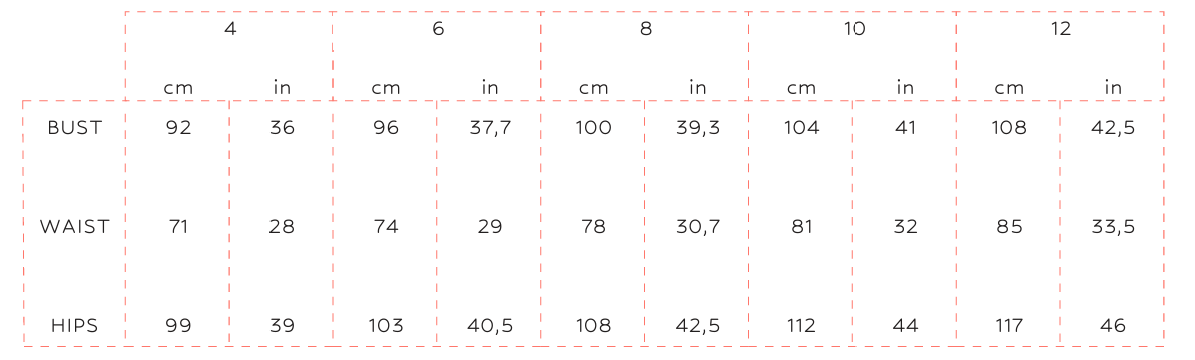
Find your size in the chart below and download the corresponding FREE PDF to get started!
DOWNLOAD FREE PDF HERE
Instructions:
Prepare the Pattern:
Download the free pattern and print it at 100% scale. If you forget to print at the correct scale, the pages might not align perfectly, but it’s manageable.
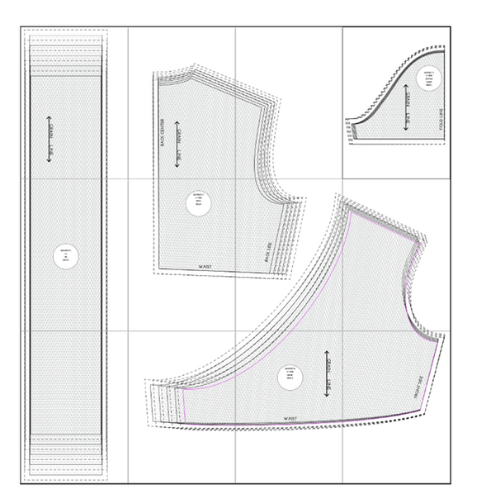
Tape the pages together. When assembled correctly, the pattern should resemble the sketch provided (the pages are numbered in order to help).
Cut the Fabric:
Transfer the pattern pieces onto your fabric.
Ensure that the grainline on each pattern piece is aligned parallel to the fabric’s selvedge.
Cut out the following pieces:
Piece A: Cut 2 (mirror one piece by flipping the pattern or folding the fabric).
Piece B: Cut on the fold.
Piece C: Cut 2 on the fold.
Piece D: Cut 2.
Sew the Bodice:
Sew the two front pieces (A) to the back piece (B). Use a straight stitch 1 cm from the edge, followed by a zig-zag stitch along the raw edge to prevent fraying.
Set the bodice aside.
Prepare the Straps (Piece D):
Take the two rectangle pieces (D) and insert a thread of yarn through the center of each piece, ensuring the ends of the yarn extend beyond both edges.
Fold each rectangle in half lengthwise, trapping the yarn inside. Pin along the open edges, and at one end of each strap, pin a diagonal line to form a triangle. For one strap, the triangle should be on the right; for the other, it should be on the left.
Sew along the pinned edges using a straight stitch 1 cm from the edge. Zig-zag stitch the raw edges to prevent fraying. Be careful not to sew through the yarn, except at the triangle.
Turn the Straps Right Side Out:
Gently pull the yarn while holding the other end to turn the fabric tube inside out.
Press the straps flat with an iron.
Attach the Straps:
Pin and sew the straps to the front bodice pieces using a straight stitch, followed by a zig-zag stitch for reinforcement.
Hem the Bodice:
Fold the raw edges of the bodice inward twice (to hide the raw edge) and press with an iron.
Sew the hem in place using a straight stitch.
Prepare the Sleeves:
Hem the bottom edge of each sleeve by folding it inward twice and sewing it with a straight stitch.
Fold the sleeve in half lengthwise and sew the side edges together to form a tube.
Attach the Sleeves:
Turn the bodice inside out and insert the sleeve into the armhole, aligning the raw edges. Pin the sleeve to the bodice, ensuring it is evenly distributed.
Sew the sleeve to the bodice with a straight stitch, then finish the raw edge with a zig-zag stitch.
Final Touches:
Trim any excess fabric or threads.
Give the garment a final press with an iron.